Stripe Billing
Introduction
This guide is required for enabling the Revaly approval engine to operate with Stripe's subscription billing service. Once the configuration is complete, Stripe will use webhooks to notify Revaly when an event happens. Revaly will then trigger the next retry attempt at a specific date and time based on the recommendation from our AI-machine learning engine
The Revaly integration with Stripe facilitates recovery for both account-level events and connected accounts. During setup, ensure that the endpoint is created appropriately, as only one option is supported at a time. The integration functions either at the account level or the connected accounts level, but not simultaneously. If you require both functionalities, please reach out to us for assistance.
ImportantPlease ensure subscriptions are set up within Stripe Subscription Billing. If that is not the case, and you are using Stripe only as a gateway, contact your CSM to discuss other potential integrations.
Workflow Validation
The Getting Started section of this guide will get you on the right path to completing a successful Stripe/Revaly integration. We understand that certain scenarios and/or requirements may differ from merchant to merchant, which is why we strongly recommend that before integrating your production account, you run through the steps outlined below with Stripe in Test Mode (a test API key starts with rk_test...). This will allow you to validate in a safe environment your most common scenarios without affecting any of your production data. Please work closely with your CSM or Integration Manager since you will need their assistance with some of the steps below.
Start by testing the following:
| Scenario | Successful if... |
|---|---|
| 1. An approved recurring payment. | you see the approval in the Transactions section of the Revaly portal |
| 2. A refund transaction (of the previously approved transaction) | you see the refund in the Transactions section of the Revaly portal |
| 3. A failed recurring payment (soft decline) | you see the decline in the Transactions section of the Revaly portal & If there is a retry scheduled in the coming days |
| 4. A failed recurring payment (hard decline) | you see the decline in the Transactions section of the Revaly portal & If the subscription is canceled (or it follows what was configured for "Subscription Status" and "Invoice Status") |
Once validation is complete, you can move forward and configure your production account with confidence and little to no room for unexpected events.
Enabling the integration
This guide requires you to have your Revaly account already setup. If you have not done this, please contact your Client Success Manager, or send an email to [email protected].
There are six steps required to complete your integration.
- Create two API keys in Stripe
- Add Revaly's IP address to Stripe's allow list (optional)
- Deactivate Smart Retries (including any other automated dunning solution)
- Create your "Companies" in the Revaly portal
- Add the Stripe integration
Soon after activating the integration between Stripe and Revaly, you may notice more cancellations in Stripe's dashboards. This happens because some subscriptions flagged for recovery in Stripe might be canceled once they enter Revaly's recovery process. Revaly follows Visa and Mastercard rules and doesn't attempt retries for hard declines. So, expect a temporary (1-2 weeks) increase in churn as part of this integration.
1. Create two API Keys in Stripe
API Keys are required for Revaly to access and update the Stripe entities. Revaly will require two Restricted API keys with no expiration dates.
- Revaly Primary Key
- Revaly Fallback Key - only used if the API transactions/second limit is exceeded on the Master Key
These are the steps needed to create a restricted API key in Stripe:
- Navigate to the API Keys page in the Developers module https://dashboard.stripe.com/apikeys
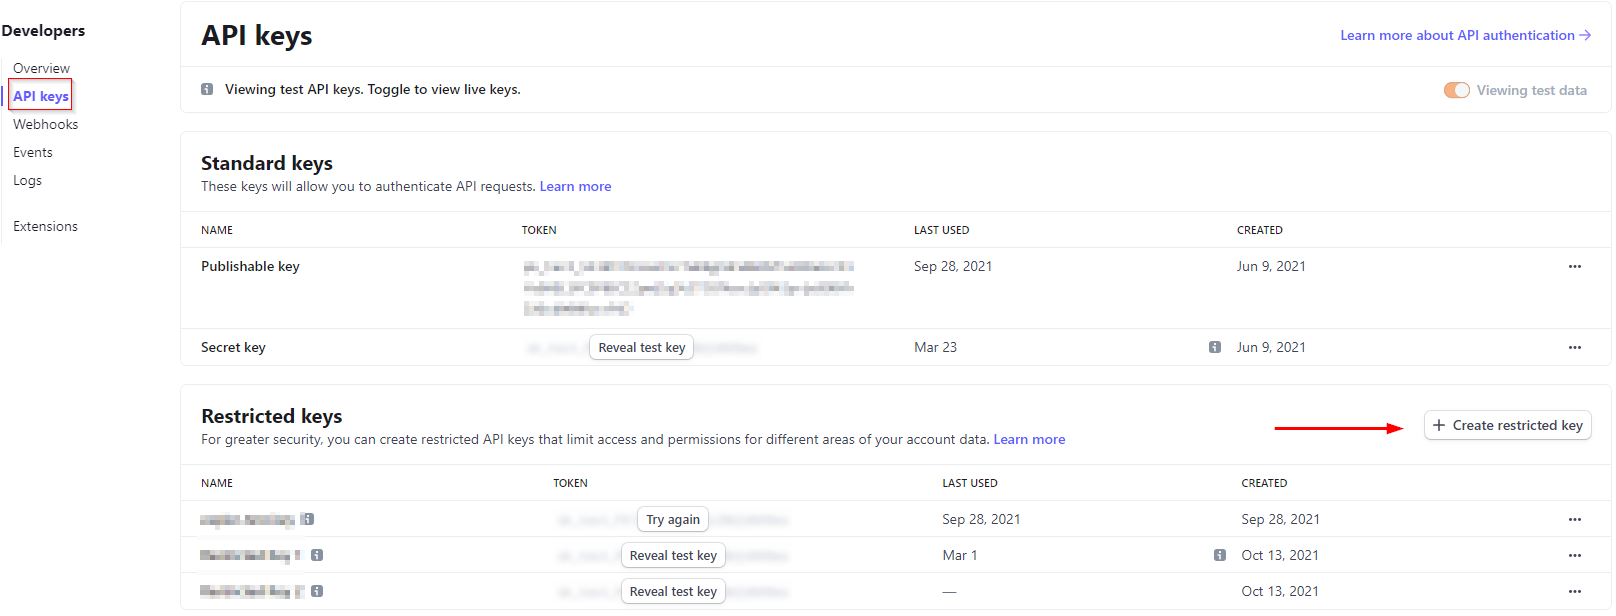
- Click the “Create restricted key” button.
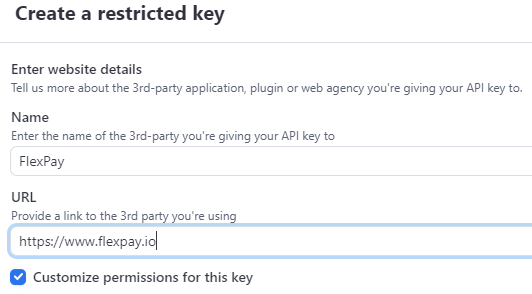
- Next, Select the option "Providing this key to another website" and click Continue.
- For the website details, enter Revaly as the name, and https://www.revaly.co as the URL. Check the option Customize permissions for this key and click Continue
- Stripe may have automatically selected permissions that are not required for Revaly. Set everything to none, except the settings highlighted below.
| Resource Type | Permission |
|---|---|
| Charges | Read |
| Customers | Read |
| PaymentIntents | Read |
| Invoices | Write |
| Subscriptions | Write |
| Webhook Endpoints | Write |
- If the integration is intended to recover payments on Connected Accounts, make sure the permissions are set in the CONNECT PERMISSIONS column, otherwise, set them in the PERMISSIONS column. If you only see one column, please proceed accordingly.
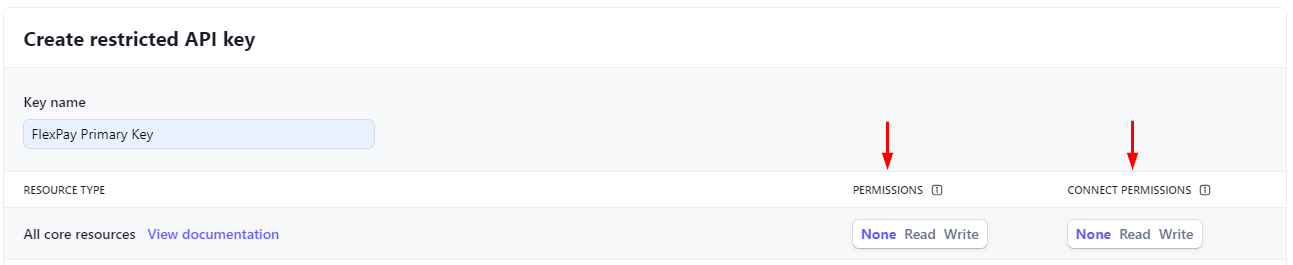
- Name the key “Revaly Primary Key” and click “Create key”
- Copy the key to a safe place. You will not be able to view it after you click Done.
- Click Done
Once the 1st Key is created. You need to repeat the same process and create a 2nd Key using the "Duplicate Key" feature. Use the name “Revaly Fallback Key”
- In the Restricted Keys section, find the "Revaly Primary Key" and click on the three dots at the end.
- Click on "Duplicate Key..."
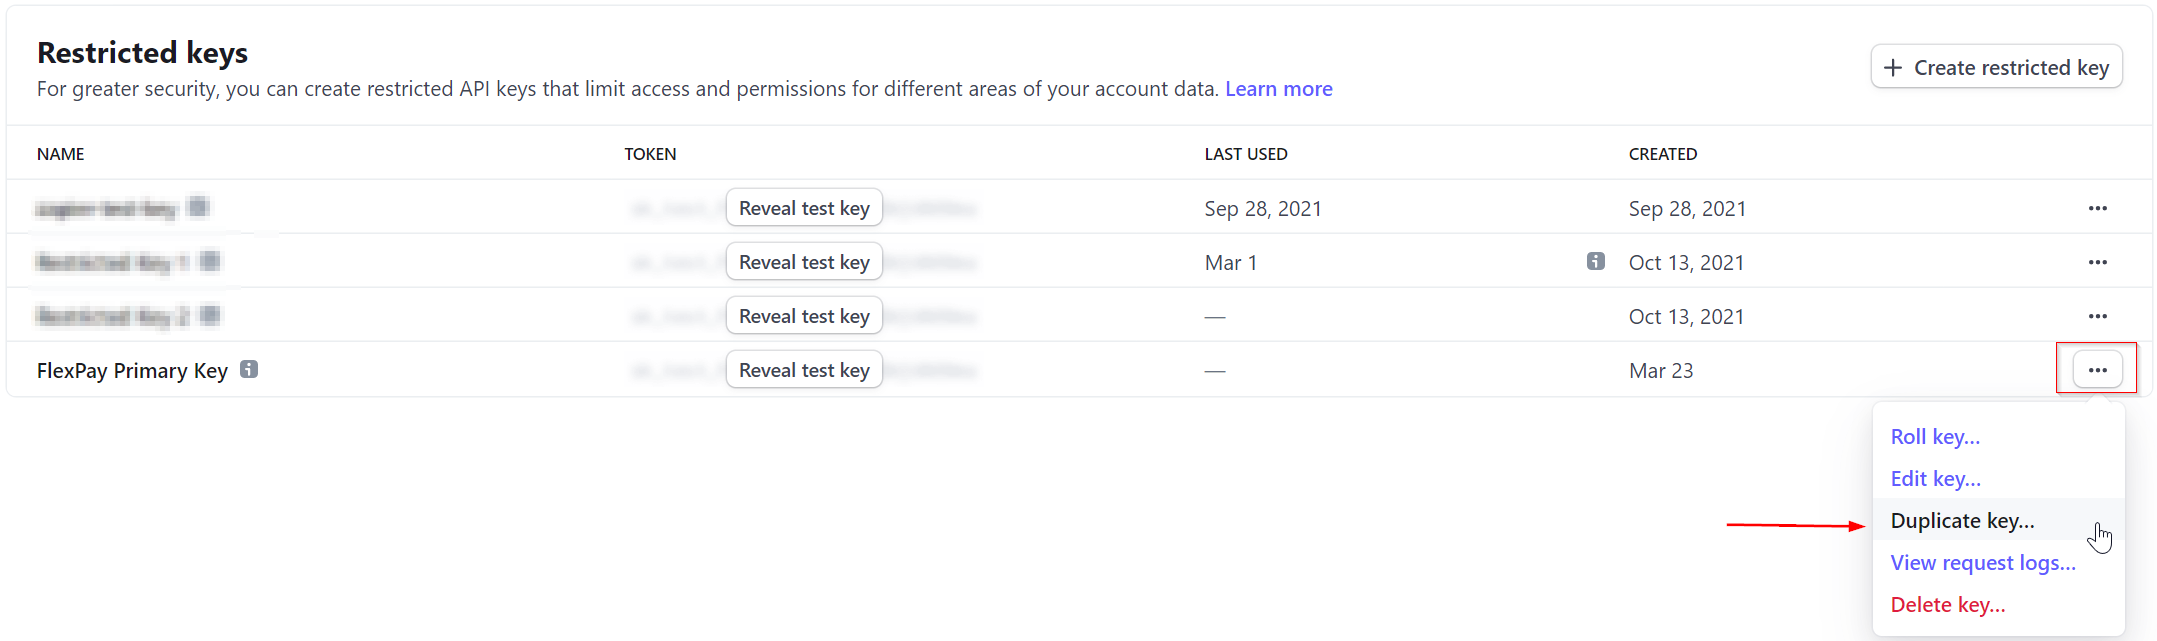
- Change the Key name to "Revaly Fallback Key"
- Scroll down and click "Create Key"
- Copy the key to a safe place. You will not be able to view it after you click Done.
- Click Done
If your Client Success Manager is configuring your account in the Revaly portal, you will need to share both keys using a secure transfer method.
Below are the configuration settings for the Restricted API Keys along with details explaining why we need the permissions as well as the errors we might see in Revaly if the permissions are not properly configured.
Resource Type | Details | Errors if not done |
|---|---|---|
Charges |
| The provided key 'rk_test__' does not have the required permissions for this endpoint on account 'acct__'. Having the 'rak_charge_read' permission would allow this request to continue |
Customers | Customer information, such as Name, Address, phone, etc., is used as additional data points in Revaly’s ML models | The provided key 'rk_test__' does not have the required permissions for this endpoint on account 'acct__'. Having the 'rak_customer_read' permission would allow this request to continue. |
PaymentIntents | Payment Intents contains important information, such as whether an invoice requires 3DS action. | The provided key 'rk_test__' does not have the required permissions for this endpoint on account 'acct__'. Having the 'rak_payment_intent_read' permission would allow this request to continue. |
Invoices | Allow Revaly to read invoice data, retry invoice and cancel invoice | StripeException The provided key 'rktest_' does not have the required permissions for this endpoint on account 'acct'. Having the 'rak_credit_note_read' permission would allow this request to continue. The provided key 'rk_test*' does not have the required permissions for this endpoint on account 'acct__'. Having the 'rak_invoice_write' permission would allow this request to continue |
Subscriptions | Will allow to read past-due subscriptions, read specific subscription information, and update the subscription status (ex: cancel) | StripeException The provided key 'rktest*_' does not have the required permissions for this endpoint on account 'acct__'. Having the 'rak_subscription_read' permission would allow this request to continue. The provided key 'rktest' does not have the required permissions for this endpoint on account 'acct_'. Having the 'rak_subscription_write' permission would allow this request to continue. |
Webhook Endpoints | To allow Revaly to create/update webhooks when creating an integration point | StripeException The provided key 'rk_test__' does not have the required permissions for this endpoint on account 'acct__'. Having the 'rak_webhook_write' permission would allow this request to continue. |
2. Add Revaly IP to Stripe's allow list (optional)
This section is only needed if you have the "Radar List" option enabled for your Stripe account
Follow these steps to add Revaly’s IP to the “Allow” list:
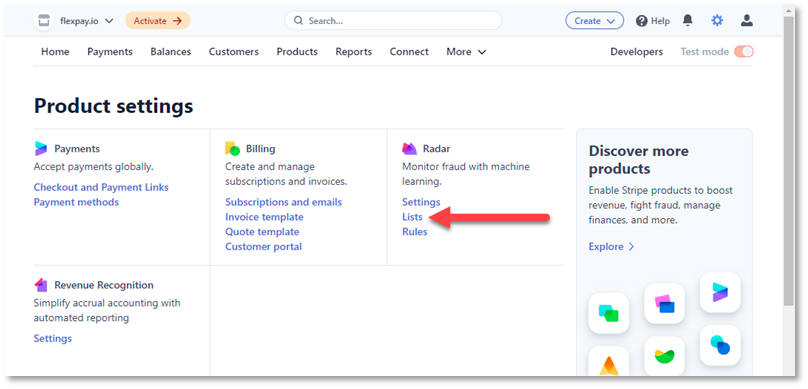
- Click on the Settings icon

- Click on the “Lists” link in the Radar section
- Click on “Client IP address allow list”
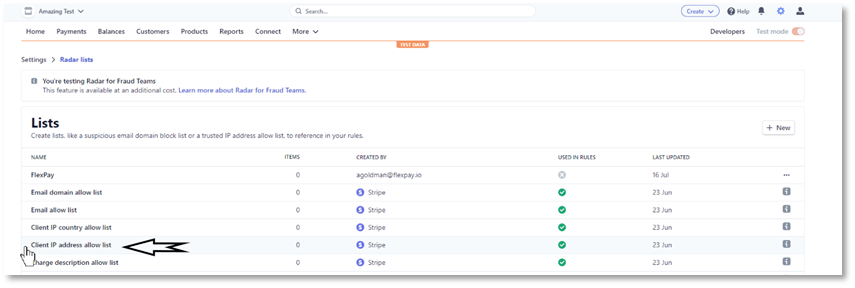
- Click on “+ Add item” button. If no items exist, it will be labeled as “+ Add your first item”
- Add the following IP to the “Single IP address” box: 13.65.95.109
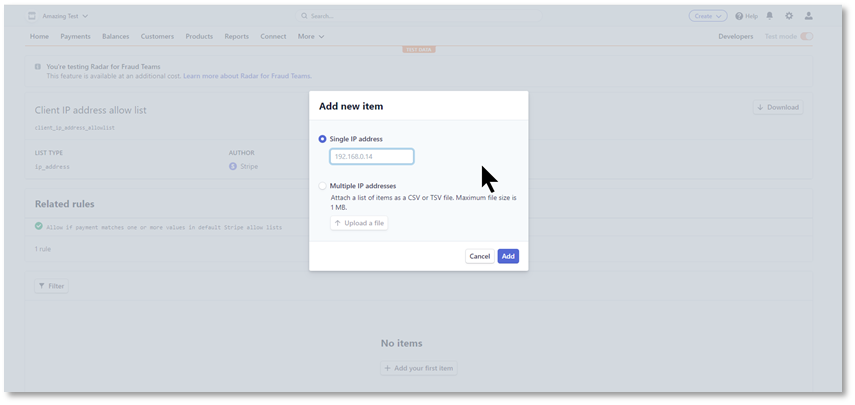
- Click the “Add” button
3. Deactivate Stripe Smart Retries
Now you must deactivate Smart Retries (or any other third-party dunning solution) on the Stripe Portal and configure the system to support Revaly. If you have custom retry rules in place, you must delete them. Please make a note (screenshot) of the existing rules before removing them.
- Click on the Settings icon

- Under Product settings, click on Billing

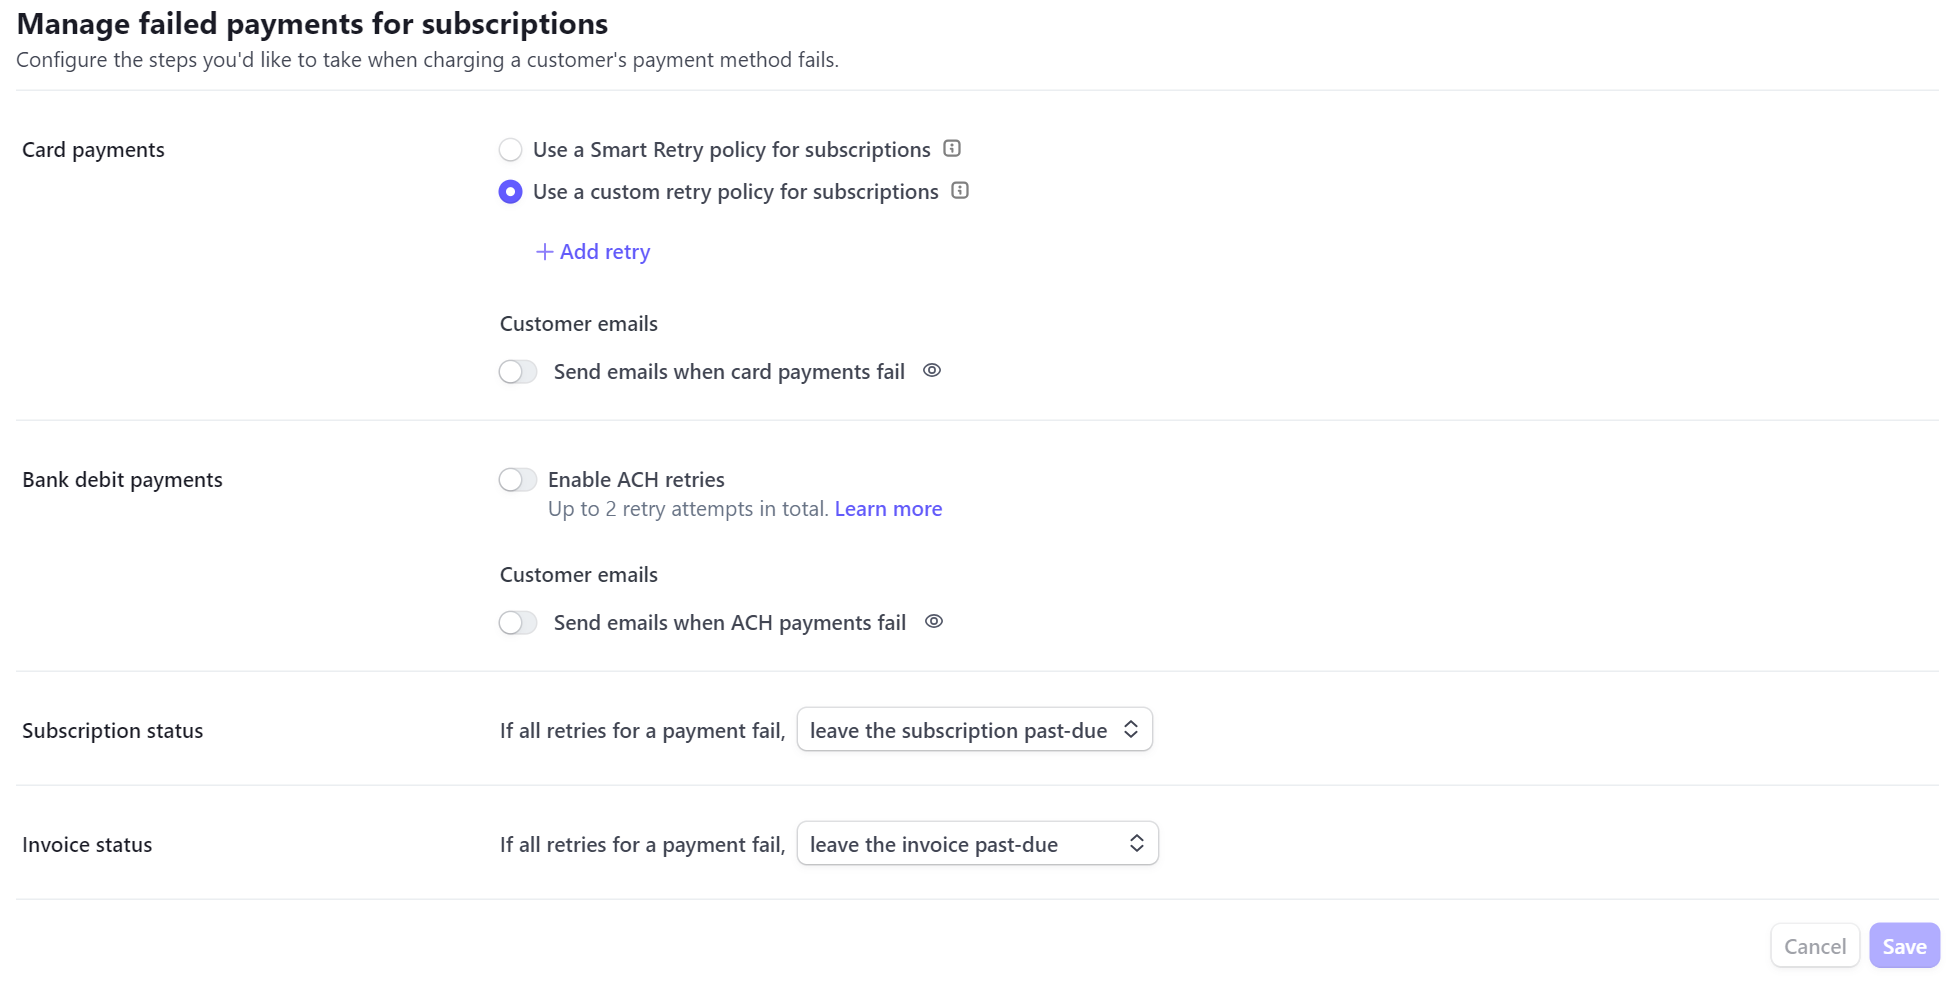
- In the Subscriptions and Emails tab, scroll down to the “Manage failed payments for subscriptions” section
- Make a note (or take a screenshot) of existing rules
- Click on “Use custom retry schedule for subscriptions”. If it’s already selected, remove any existing rules by clicking on the “X” next to the rule

- Disable “Send emails when card payments fail”
- Set the Subscription status to “leave the subscription past-due"
- Set the Invoice status to “leave the invoice past-due"
- Click on the “Save” button. When you are done, it should look like this:
NoteSubscription Status and Invoice Status will be determined as per the Revaly Configuration done later in this process. If the “Send emails” option isn’t turned off, emails will be sent on every failed charge.
4. Create your "Companies" in the Revaly portal
When adding your companies, you need to create one per Stripe account. Please follow the regular process as described in the Companies section of the Client Portal guide.
5. Add the Stripe integration
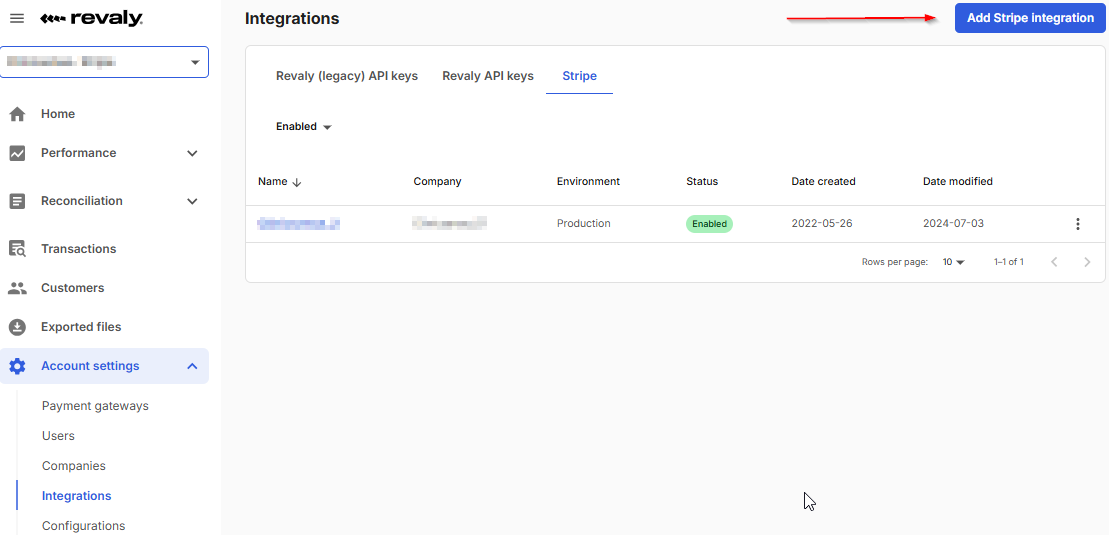
- In Revaly's portal, go to Account Setting > Integrations > Stripe
- Click on the “Add Stripe Integration” button
- Enter the information for the three Steps need to complete the configuration.
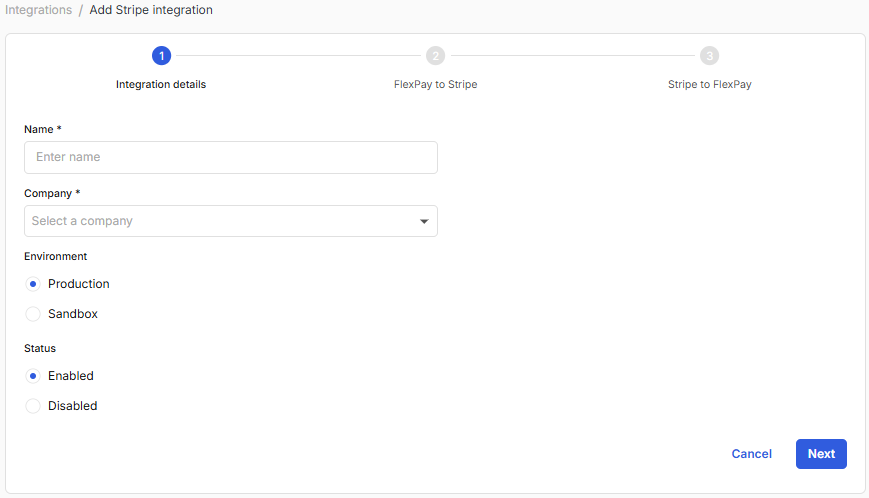
Integration Details
- Name: Configuration name (we recommend you use the Account Name you have in Stripe)
- Company: Choose the appropriate company from the dropdown list.
- Environment: Options are “Live” and “Sandbox”. Please select “Live”
- Status: Options are “Enabled” or “Disabled”.
- Description: Since this will show in the webhook, we recommend you use “Revaly Webhook EndPoint”
When an Integration is set to Status “Disabled”, the Webhook and Revaly Listener will be disabled on Stripe's end AND Revaly's end. However, transactions that are already scheduled to be retried at a future date in Revaly will still run. In order to stop this from happening, you must delete the restricted key provided to Revaly.
Revaly to Stripe
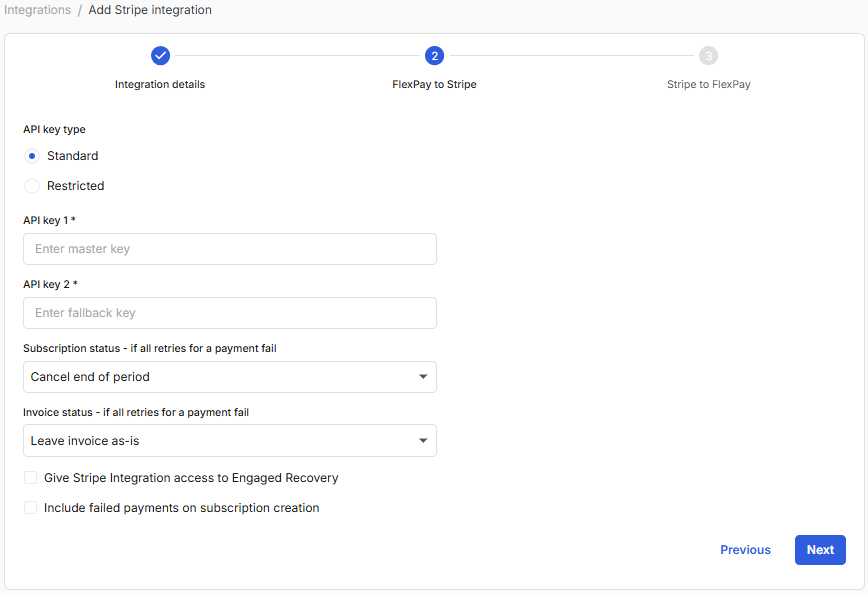
- API Key Type: Options are “Restricted” or “Standard”. Please select “Restricted” by default. The Standard Key isn’t recommended as it would grant Revaly full access to your Stripe configuration, providing Revaly more access than is needed. Both the Standard and Restricted Key will work, but we recommend Restricted.
- API Key 1: Please enter the Master API Key you created at the start of this guide.
- API Key 2: Please enter the Fallback API Key you created at the start of this guide. It will only be used when too many simultaneous requests are made with the Master Key.
- Subscription Status: If all retries for a payment fail, your options are:
Cancel End of Period – Stripe functionality will cancel the Subscription at the end of the subscription end date
Cancel Subscription with delay – Stripe functionality will cancel the Subscription at the moment of a hard decline PLUS X-Days and X-Hours as shown below. If you leave the settings at 0 days/0 hours, the subscription will cancel immediately. NOTE: Please keep in mind that proration is enabled by default in Stripe. This option may give proration credits to your customers. Learn about prorations
Cancel Subscription with delay (with no proration) – Same functionality as the previous option, but proration will not apply. When a subscription is cancelled, no credit will be given to your customer.
Leave Subscription As-Is: doesn’t update the Subscription status - Invoice: If all retries for a payment fail. – Options are:
- Mark the invoice as uncollectible when subscription cancels - Sets the Invoice status to Uncollectible. This option will also send fp-uncollectible: true metadata to both Invoice and Subscription.
- Leave Invoice As-Is – The Invoice remains in “Failed” status while Revaly is attempting to recover the payment. When Revaly is unable to recover the payment, the Invoice will remain in “Failed” status.
- Include failed payments on subscription creation: By default, this integration processes failed rebill payments. If your use case requires Revaly to also handle failed payments at the time of subscription creation, ensure this checkbox is selected.
- Calculate delay based on invoice creation date/time: By default, the delayed subscription cancellation is calculated from the moment a "hard decline" payment is received. If this checkbox is selected, the delay will instead be calculated using the invoice creation date and time.
- Once completed, click "Next"
NoteWhether you are creating or updating the integration and you click “Next,” it will save and record whatever the configurations are on the page. For example, if you are updating an existing integration and you choose "disable" as the status, then go to the next screen, and then hit cancel, it will be disabled, even though you hit “cancel” on the next page.
In the "Stripe to Revaly" tab, you have to choose if you want to manually create the webhook in Stripe, or if you want Revaly to handle it via the API (this is our recommended method).
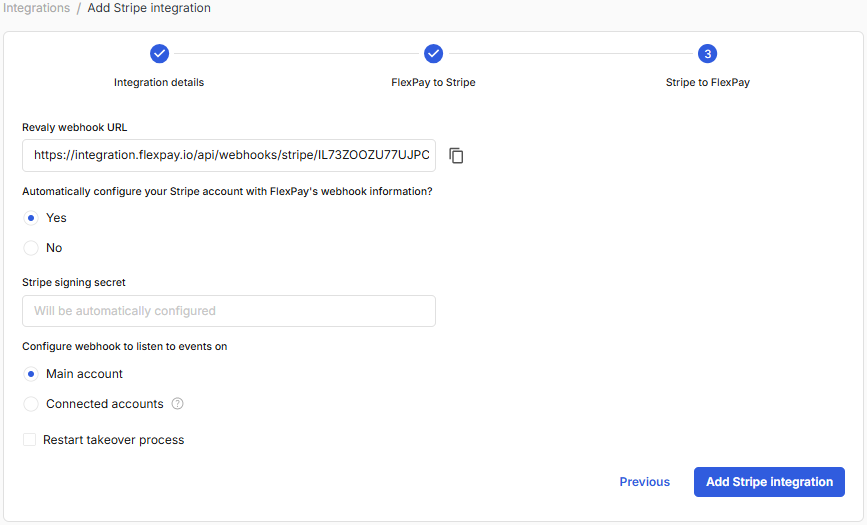
- If you want us to handle the webhook creation, choose "Yes".
- If the integration will be working with Connected Accounts in Stripe, select "Connected accounts" under "Configure webhook to listen to events on", otherwise leave "Main account" selected.
- Restart takeover process: you can let Revaly take over existing failed invoices. This process brings all the open overdue invoices that are “AutoPayment” to the Revaly platform to be retried. This will include invoices that have Failed & Retrying. You can “un-check” the takeover process and choose to trigger it after the Stripe integration is created by updating the integration.
- Once completed, click "Add Stripe Integration"
NoteThe “Take Over Process” is a one-time process executed when you are first onboarded to Revaly.
Please note that the takeover process does not work for payments in Connected Accounts.
You have completed setting up Revaly to run decline salvage on your Stripe account.
If ANY of these steps are unclear, please, email us for assistance at: [email protected]