Manage Users
This guide explains how to manage user accounts in Revaly, including adding, updating, disabling, and deleting users.
Users in your organization can access Revaly's Client Portal to view and manage various aspects of your account, with permissions managed by different access levels. When your Revaly account is set up, an Account Administrator is designated for the Client Portal, providing full access to the account. This admin can then create additional users as needed, with multi-factor authentication (MFA) automatically enabled for each new user.
Revaly uses multi-factor authentication (MFA) to enhance account security by requiring an extra verification step during login. This added layer helps ensure that only authorized users can access your account, even if their password has been compromised.
Setting Up the First User
When your Revaly account is first created by a member of our enablement team, an initial user is set up with Account Administrator permissions, granting the highest level of access.
Please follow the steps indicated in the User Account Setup to complete setting up your account.
Add a User
As an Account Administrator, you can add additional users to your Revaly account from the Users section, located under Account Settings in the left-side navigation menu. To add a new user, follow these steps:
- Click Add User.
- Complete all required fields, marked with an asterisk (*).
- Choose the appropriate Access Level based on the user’s permissions needs, whether for view-only access or more advanced management permissions.
After completing the fields, the Add User button will activate. Click it, and the new user will be added to the list.
An email will automatically be sent to the new user with a portal link and their temporary password. To finish setting up their account, the user should follow the steps in the User Account Setup document.
Resend Email Invitation
If a user doesn’t receive their email invitation or accidentally deletes it, the Account Administrator can easily resend the invitation:
- Log in to the Client Portal and navigate to Account Settings > Users.
- Find the user in the list, then click the three dots on the right side of the screen to open the options menu and select Resend Invite.
The user will receive a new invitation email, allowing them to proceed with their account setup.
Note:The Resend Invite option is only available if the user hasn’t yet changed their temporary password. If they’ve already updated their password and need a new one, they should follow the steps outlined here Resetting Your Password
Update a User
If you need to modify a user's Access Level or other account details, follow these steps:
- Log in to the Client Portal and navigate to Account Settings > Users.
- Find the user you wish to update, then click the three dots on the right side of the screen to open the options menu and select Update user.
- In the Update User screen, make the necessary changes.
- Click Save to apply the updates.
Disable or Delete a User
If you need to disable or delete a user from your account, please follow these steps:
- Log in to the Client Portal and navigate to Account Settings > Users.
- Find the user, then click the three dots on the right side of the screen to open the options menu and select Disable user or Delete user.
- Depending on your choice, follow the appropriate steps:
If you selected Disable user, in the confirmation screen, click Disable user.
If you selected Delete, , in the confirmation screen, toggle the option "I confirm deletion of this user", then click Delete user.
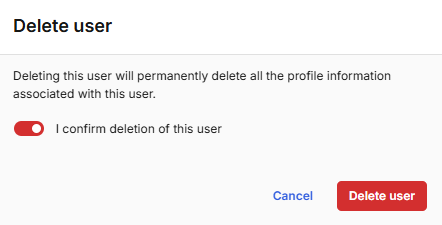
If you disabled the user, their status will show as "Disabled." If you deleted the user, they will be fully removed from the Users screen. In both cases, the user will no longer have access to their account.
User Access Level
You can assign different Access Levels to users based on their needs. Access Level defines the permissions a user has within the system, such as viewing or managing data. When a new account is created, an Account Administrator is set up by default. This user has the highest level of access and can then create and manage other users. The available access levels are:
- Account Administrator: Grants full control over the account. Can create other users, export data, generate API keys, and more.
- Account Reader: Provides read-only access to the account.
- Gateway Account Manager: Allows access only to transactions. Reports are not visible.
- Gateway Administrator: Similar to the Account Reader role, but with the additional ability to add new payment gateways.